Food Photography Lighting Lesson: Learning with Sprouts
Disclaimer:
My food photography is a work in progress. As I embark on learning this new craft, I have found it immensely helpful to read everything there is on the different elements of food photography. The information that other food bloggers and photographers have on their sites have been immensely helpful. So, I have decided to document and share my learning process too. Perhaps seeing the mistakes and corrections I make will help others who decide to take this journey.
The weather...the light:
It's cloudy, rainy and totally gross outside, the perfect weather for food photography! Confession: The access to natural light in my tiny apartment is abysmal. I use a very small window and hope for the best. I shoot mainly out of that room, because everything is setup and I can shut the door. And the shutting the door thing has been super important ever since my Newfoundland, Moose, ate a photoshoot of mine. That story to come. Boy, was he ever in trouble!
The Plan:
I've been super swamped lately, so today I wanted to take some ingredient shots, make some simple recipes, and gain some time back.
The Reality:
I was having too much fun, and my simple brussels sprout photo shoot turned into an all-day event.
The Subject:
Duh, Brussel Sprouts!
The Original Shoot:
My initial Brussels sprout photo shoot was at the end of September in my dining room. Overhead lights shone down on them with black foam board behind and on the side of them. Also, the blinds were open. Shots were closeup based on inspiration found online. Lighting and setup were based on lack of knowledge.
Food Photography Lighting Lesson the First:
Use one source of light.
Food Photography Lighting Lesson the Second:
Overhead lighting is not flattering.
Look at the way the entire image is foggy and covered in light.
You lose the depth of the shadows and highlights.
Food Photography Lighting Lesson the Third:
Editing photos can do wonders, but it's best to just start out with the proper lighting.
Food Photography Lesson the Fourth (not on lighting):
Don't cook your food the entire way through before taking photos.
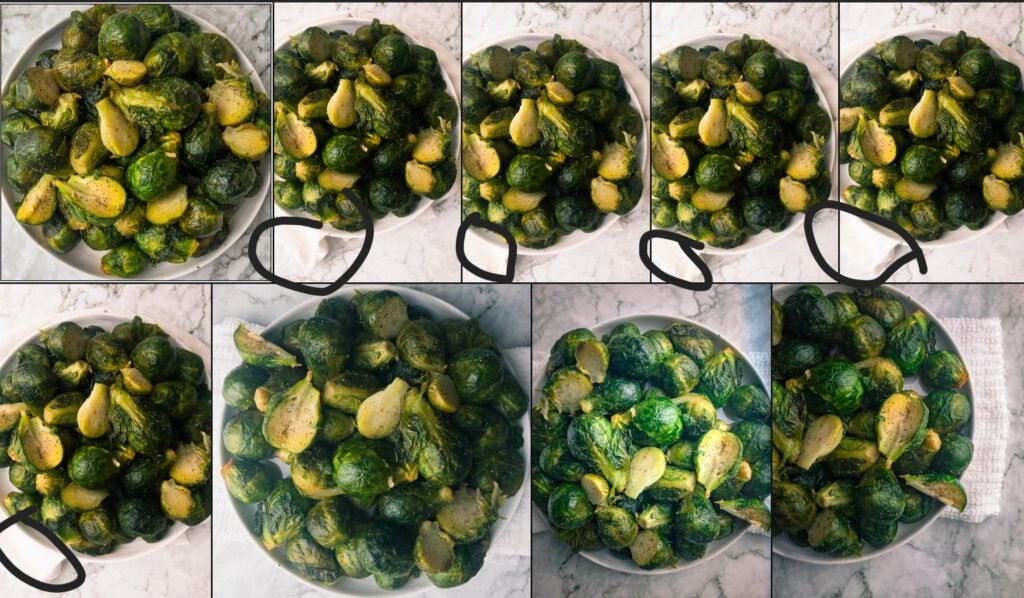
The screenshots below represent some before and after photos I took of photo shoot one:
Shoot 2, One Week Later:
Changes include:
Used new lighting equipment and backdrops.
Shot overhead.
Mistakes still made:
Two light sources.
Fully cooked veggies.
Shadows/Highlights/Overexposure on the whites (see circled areas).
Shoot 3 (December - 2 1/2 months after original shoot):
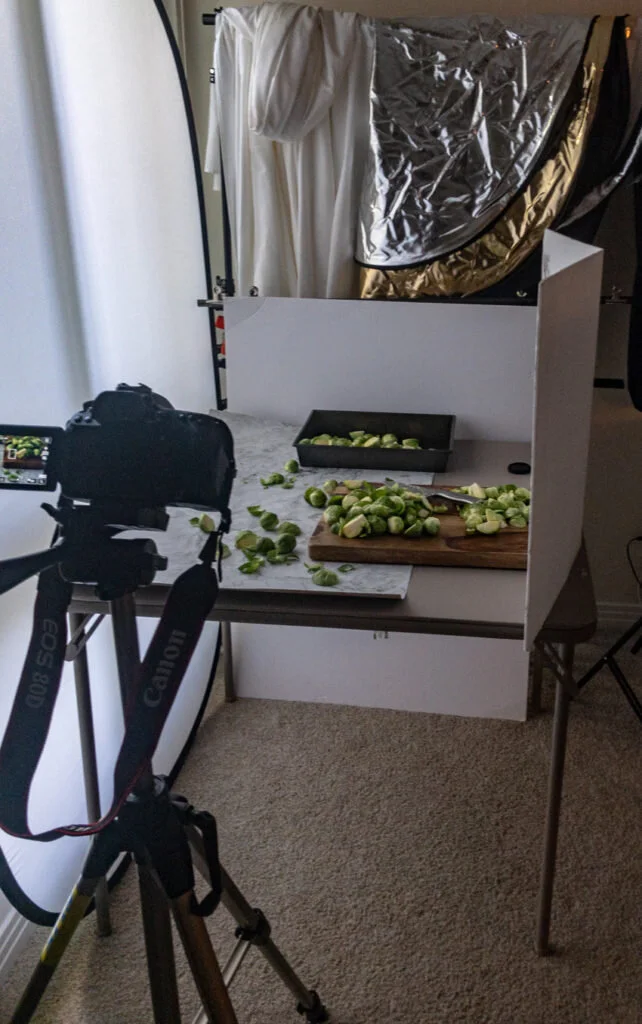
The Setup:
This time, natural lighting was used.
Notable differences:
Using natural light, the sprout color became more vibrant and truer to its real green.
Natural light helped bring out more of the shadows and highlights.
Colors were chosen more deliberately to help bring the focus to the food and be free of other distractions.
The raw sprouts with the knife and cutting board help tell the story of the sprouts, like you were just cutting them.
The process:
No editing has been done to these images. Here you will see what changes I made to affect the subject and the light as I took the pictures.
Setup 1:
For the first set of images, I was testing the light and playing with the settings on my camera. Both images are shot on an f / 4.0 and with a shutter speed of 1/30. The darker image on the left was shot at ISO 320. To increase the light, the ISO of the photo on the rights increased to 500.
For the second set of images, I remained at ISO 500, but removed the reflector. I was using a silver reflector in the first image. At first glance it may be hard to see the difference, but note the changes when I call them out with circles. By reflecting the light back onto the sprouts, the shadows and highlights change. Those sprouts closest to the reflector become slightly more covered in shadow, where just an inch or two away from the reflector more highlight appears.
Setup 2:
For setup 2, I was focusing on the circled shadows against the sprouts. I wasn't happy with how dark and sharp they were. I wanted to spread out that light. All images were shot at f/5.0 and a shutter speed of 1/20.
Image 1: natural light, no diffuser. ISO 400.
In order to spread out the light more, for image 2 I added a diffuser over the window. Unfortunately, that made the image way to dark when I remained at ISO 400.
With image three, instead of messing with the ISO, I brought in a white bounce card first. Notice how this card brings more light into the photo, but it still remained dark. It also helped fix the harsh shadow a bit more.
In image four, I finally increased the ISO up to 500. This definitely helped. The image was lighter and the shadow was getting better. It still wasn't perfect.
For Image 5 I got it right. I was hesitant to increase the ISO even more, since that can affect graininess, so instead I brought the bounce card much closer to the edge of the frame. You can actually see it in the frame.
Now, let's compare image 1 to image 5. The changes made were to add a diffuser, increase the ISO by 100 and bring in a bounce card to the edge of the frame. As you can see, these three changes spread out the shadow more evenly, and brings more light into the photo.
Setup 3:
As it was getting even darker outside and I was losing my light, no diffuser was used this time. Instead, I used a lower shutter speed and f-stop to allow more light into the camera. I also took different angled shots, but mainly focused on where the subject was framed, and bouncing the light with the bounce card. Below is one of the images I took. Both images have the same settings (f/3.2, shutter speed of 1/13, ISO 250) The only difference is the bounce card. In the image on the left the bounce card was missing. On the right, it is present. Please note that the camera settings I chose aren't necessarily the correct choices, they use represent what I used in this learning process.
Did you enjoy reading my Food Photography Lighting Lesson? Let me know by leaving me a comment below. You can also follow me on Instagram and use the hashtag #masterfoodphotography whenever you want to share something you think I'll like.


